> For clean Markdown of any page, append .md to the page URL.
> For a complete documentation index, see https://akamai.ferndocs.com/edge-workers/redirect-pages-based-on-location/llms.txt.
> For AI client integration (Claude Code, Cursor, etc.), connect to the MCP server at https://akamai.ferndocs.com/_mcp/server.
# Redirect pages based on location
In this tutorial you'll learn how to create an EdgeWorkers function that provides a customized user experience. Using less than 35 lines of code and EdgeScape geo data you can redirect web-site visitors to country specific content.
This example invokes an EdgeWorkers script at the `onClientRequest` phase of an HTTP request as the first event before caching occurs. Then, based on the request's country of origin, the response redirects users to location specific content.
> 📘 You can find the [redirect-geo](https://github.com/akamai/edgeworkers-examples/tree/master/edgecompute/examples/traffic-routing/redirect-geo) code sample in the EdgeWorkers examples GitHub repo.
# Before you begin
Before you can configure your EdgeWorkers function, you need to do a few things:
- Get access to the EdgeWorkers interface in Akamai Control Center. This interface lets you perform the administrative tasks required to execute EdgeWorkers functions. You need to have a Control Center account that's been granted access to the EdgeWorkers Management application. If you're not sure, talk to your local Akamai admin, or contact your Akamai account team.
- [Add EdgeWorkers to your contract](add-edgeworkers-to-contract.md). If you have an active Akamai contract and login credentials for Akamai Control Center you can sign up for the EdgeWorkers Evaluation tier. The Evaluation tier lets you try EdgeWorkers for free and without a time limit. If you're not already an Akamai customer or you don't have access to Akamai Control Center you can sign up for an EdgeWorkers free trial.
# 1. Create an EdgeWorker ID
An EdgeWorker ID lets you enable the EdgeWorkers behavior in Akamai Control Center. It's also a unique identifier for your EdgeWorkers code.
1. Log in to Control Center .
2. Go to ≡ > **CDN** > **EdgeWorkers**.
3. Click **Create EdgeWorker ID**.
You cannot edit this auto-generated, unique identifier.
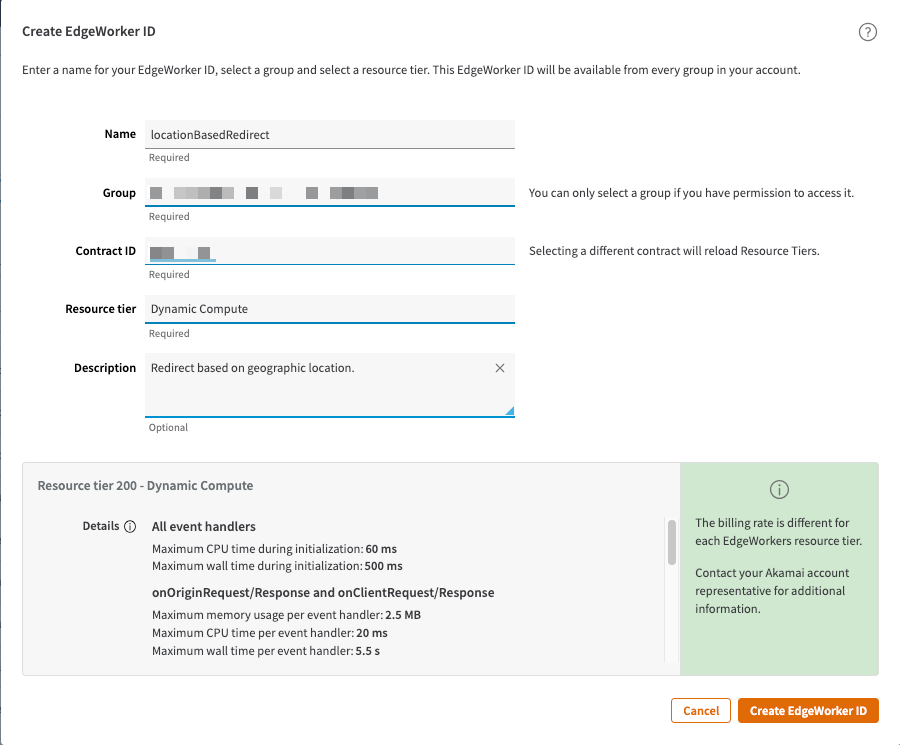 4. Enter `Geolocation redirect` as the name for the EdgeWorker ID.
5. Select a Group Association.
You can select only a group that you have permission to access.
6. Select a Contract ID to associate with the EdgeWorker ID.
The available resource tiers are filtered based on the contract ID you select.
> 📘 The Contract ID field only appears if you have more than one contract ID associated with your account.
7. Select a resource tier.
EdgeWorkers resource tiers currently include and **Dynamic Compute**, **Enterprise Compute**, and **Basic Compute**.
The limits for each resource tier are different. You can view the limits for the selected resource tier in the details section or you can view the [Resource tier limitations](resource-tier-limitations.md) section.
8. Click **Create EdgeWorker ID**.
# 2. Add the EdgeWorkers behavior
When you add the EdgeWorkers behavior in Property Manager you can also define which requests apply EdgeWorkers functions. By limiting the scope you can avoid unnecessary serverless hits to improve performance and reduce cost.
1. Navigate to your property in Control Center .
2. Click **Edit**.
3. Click **+ Rules**.
4. Enter `Geolocation redirect` as the name for the EdgeWorker ID.
5. Select a Group Association.
You can select only a group that you have permission to access.
6. Select a Contract ID to associate with the EdgeWorker ID.
The available resource tiers are filtered based on the contract ID you select.
> 📘 The Contract ID field only appears if you have more than one contract ID associated with your account.
7. Select a resource tier.
EdgeWorkers resource tiers currently include and **Dynamic Compute**, **Enterprise Compute**, and **Basic Compute**.
The limits for each resource tier are different. You can view the limits for the selected resource tier in the details section or you can view the [Resource tier limitations](resource-tier-limitations.md) section.
8. Click **Create EdgeWorker ID**.
# 2. Add the EdgeWorkers behavior
When you add the EdgeWorkers behavior in Property Manager you can also define which requests apply EdgeWorkers functions. By limiting the scope you can avoid unnecessary serverless hits to improve performance and reduce cost.
1. Navigate to your property in Control Center .
2. Click **Edit**.
3. Click **+ Rules**.
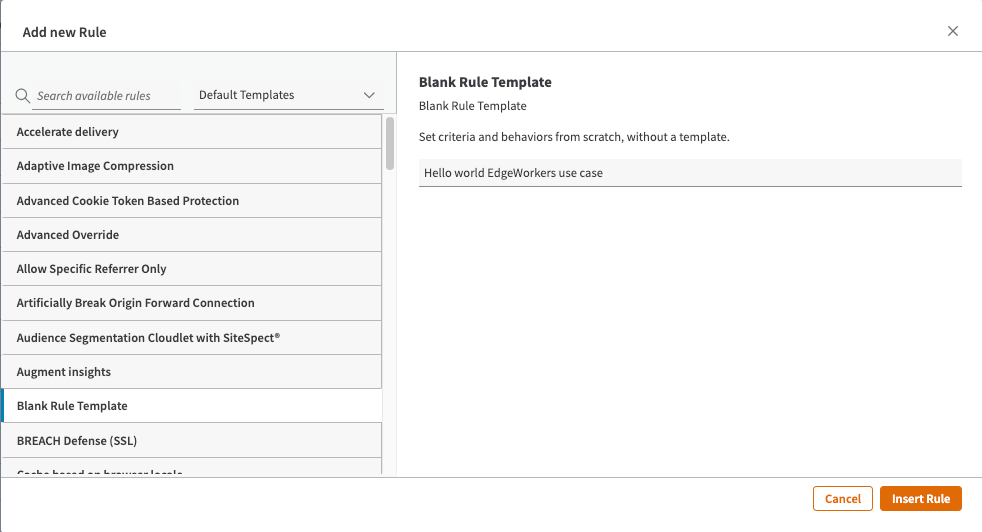 4. Enter a name for your rule and click the **Insert Rule** button.
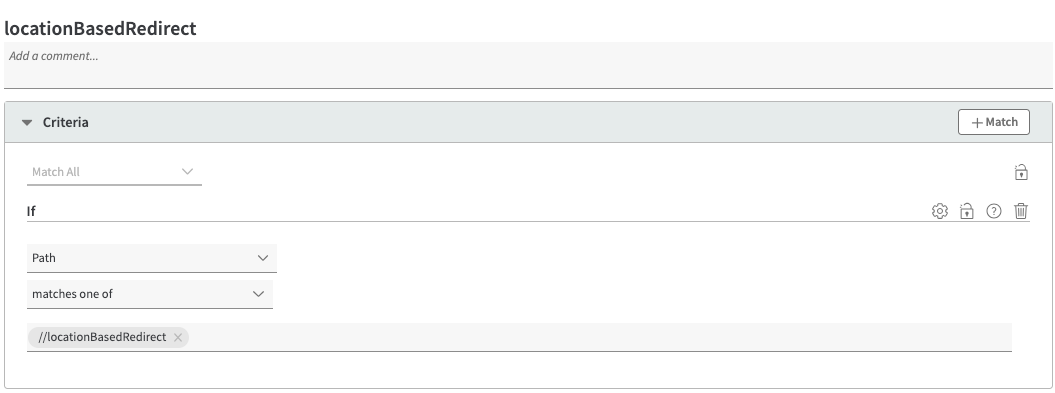
5. Click the **+ Match** button to add a `match criteria` and `scope`.
The criteria below only executes the EdgeWorkers function when the path matches `locationBasedRedirect`.
4. Enter a name for your rule and click the **Insert Rule** button.
5. Click the **+ Match** button to add a `match criteria` and `scope`.
The criteria below only executes the EdgeWorkers function when the path matches `locationBasedRedirect`.
 6. Next, click the + Behavior button and select standard property behavior,
7. Search for `EdgeWorkers` in **available behaviors**.
6. Next, click the + Behavior button and select standard property behavior,
7. Search for `EdgeWorkers` in **available behaviors**.
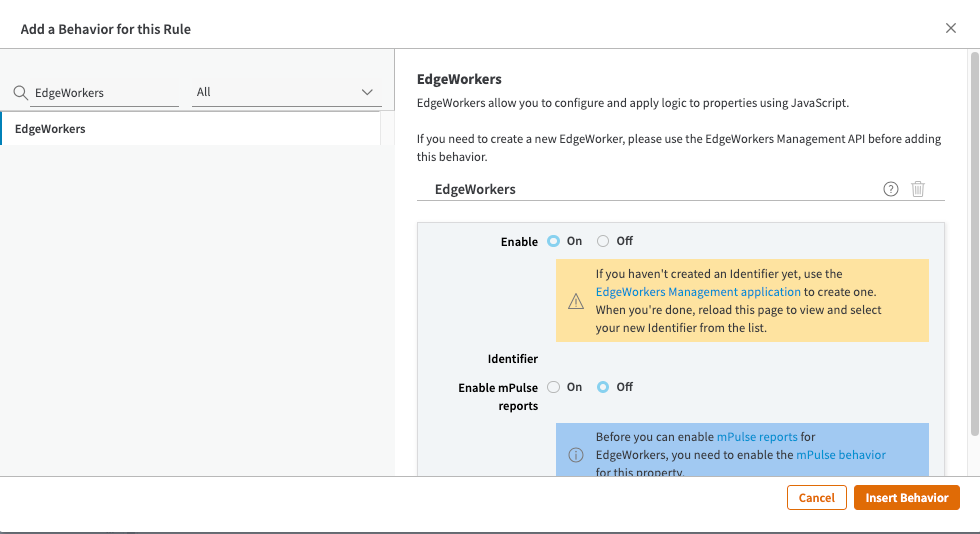 7. Change the setting to **On**.
8. Click **Insert Behavior**.
9. Select the EdgeWorker ID that you created in step 1 from the list.
10. Save your property.
11. Click the **Activate** tab.
12. Click the **Activate on Staging** button.
# 3. Create the code bundle
To create a code bundle you need a `main.js` source file and a `bundle.json` manifest file.
1. Create a folder on your computer for the code bundle files.
2. Go to the [EdgeWorkers GitHub repository](https://github.com/akamai/edgeworkers-examples/tree/master/edgecompute/examples/traffic-routing/redirect-geo) and download the `main.js` and `bundle.json` files from the **redirect- geo** project or create them using the values below.
This JavaScript sample is commented to help you understand the logic behind the use case and code.
```javascript
/*
(c) Copyright 2023 Akamai Technologies, Inc. Licensed under Apache 2 license.
Version: 0.1
Purpose: Using EdgeScape geo data, redirect user to country specific content
Repo: https://github.com/akamai/edgeworkers-examples/tree/master/redirect-geo
*/
//Define the top level domain mapping for Canada, the U.S., and UK.
const tldMap = {
CA: '.ca',
GB: '.co.uk',
US: '.com'
};
//Implement onClient request as the first event before caching occurs.
export function onClientRequest (request) {
//Create a subdomain from the host of the incoming request.
const subDomain = request.host.split('.')[0];
//Create a domain from the host of the incoming request.
const domain = request.host.split('.')[1];
//Determine the top level domain based on the request's country of origin.
let tld = tldMap[request.userLocation.country];
//Set the default domain to .com.
if (tld === undefined) {
tld = '.com';
}
//Build up new domain based on the location of the request. For example, .ca for Canada.
const redirectDomain = subDomain + '.' + domain + tld;
//Check the incoming domain to see if the incoming domain is different from the built up domain.
if (request.host !== redirectDomain) {
//Redirect to new host. If a redirect is required, return the location header with the new domain in the response.
request.respondWith(302, {
Location: [request.scheme + '://' + redirectDomain + request.url]
}, '');
}
}
```
3. Create the `bundle.json` manifest file.
```shell
{
"edgeworker-version": "1 ",
"description" : "Perform redirect"
}
```
4. Compress the files into a code bundle.
```shell
tar -czvf filename.tgz main.js bundle.json
```
# 4. Deploy the code bundle
To deploy the code bundle you need to create an EdgeWorker version.
1. Go to ≡ > **CDN** > **EdgeWorkers**.
2. From the EdgeWorkers IDs page, select the EdgeWorker ID that you just created.
3. Click the **Create version** button.
7. Change the setting to **On**.
8. Click **Insert Behavior**.
9. Select the EdgeWorker ID that you created in step 1 from the list.
10. Save your property.
11. Click the **Activate** tab.
12. Click the **Activate on Staging** button.
# 3. Create the code bundle
To create a code bundle you need a `main.js` source file and a `bundle.json` manifest file.
1. Create a folder on your computer for the code bundle files.
2. Go to the [EdgeWorkers GitHub repository](https://github.com/akamai/edgeworkers-examples/tree/master/edgecompute/examples/traffic-routing/redirect-geo) and download the `main.js` and `bundle.json` files from the **redirect- geo** project or create them using the values below.
This JavaScript sample is commented to help you understand the logic behind the use case and code.
```javascript
/*
(c) Copyright 2023 Akamai Technologies, Inc. Licensed under Apache 2 license.
Version: 0.1
Purpose: Using EdgeScape geo data, redirect user to country specific content
Repo: https://github.com/akamai/edgeworkers-examples/tree/master/redirect-geo
*/
//Define the top level domain mapping for Canada, the U.S., and UK.
const tldMap = {
CA: '.ca',
GB: '.co.uk',
US: '.com'
};
//Implement onClient request as the first event before caching occurs.
export function onClientRequest (request) {
//Create a subdomain from the host of the incoming request.
const subDomain = request.host.split('.')[0];
//Create a domain from the host of the incoming request.
const domain = request.host.split('.')[1];
//Determine the top level domain based on the request's country of origin.
let tld = tldMap[request.userLocation.country];
//Set the default domain to .com.
if (tld === undefined) {
tld = '.com';
}
//Build up new domain based on the location of the request. For example, .ca for Canada.
const redirectDomain = subDomain + '.' + domain + tld;
//Check the incoming domain to see if the incoming domain is different from the built up domain.
if (request.host !== redirectDomain) {
//Redirect to new host. If a redirect is required, return the location header with the new domain in the response.
request.respondWith(302, {
Location: [request.scheme + '://' + redirectDomain + request.url]
}, '');
}
}
```
3. Create the `bundle.json` manifest file.
```shell
{
"edgeworker-version": "1 ",
"description" : "Perform redirect"
}
```
4. Compress the files into a code bundle.
```shell
tar -czvf filename.tgz main.js bundle.json
```
# 4. Deploy the code bundle
To deploy the code bundle you need to create an EdgeWorker version.
1. Go to ≡ > **CDN** > **EdgeWorkers**.
2. From the EdgeWorkers IDs page, select the EdgeWorker ID that you just created.
3. Click the **Create version** button.
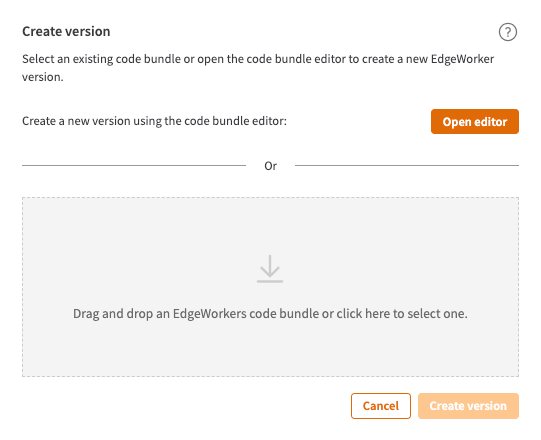 4. Drag and drop the code bundle onto the window and click the **Create version** button.
# 5. Activate the EdgeWorker version
1. From the EdgeWorkers versions page, select your EdgeWorker ID.
Only the EdgeWorkers you have permission to access appear in the list.
2. Click the **Activate version** button.
3. Select the EdgeWorker version that you want to activate.
4. Select the **Staging** network to test your code sample.
# 6. Test the EdgeWorkers function
You can use a curl request, resolved to staging, to exercise the EdgeWorkers function.
> 📘 For more information on how to resolve an IP address refer to the [Getting Started for HTTPS Properties](https://techdocs.akamai.com/property-mgr/docs/serve-content-over-https) documentation.
1. Use this curl request to test the `locationBasedRedirect` EdgeWorkers function.
Replace [akamai staging name] with the staging Edge hostname of your website. The staging Edge hostname uses the **.edgekey-staging.net** domain.
```curl
curl https://[your website name]/redirectGeo --connect-to ::[akamai staging name] -H "Pragma: akamai-x-ew-debug" -sD - -sD -
```
2. The curl request should produce output similar the following.
```html
HTTP/2 302
location: https://[your website name]/redirectGeo
content-type: text/html
content-length: 0
expires: Wed, 07 Jun 2023 15:18:43 GMT
cache-control: max-age=0, no-cache, no-store
pragma: no-cache
date: Wed, 07 Jun 2023 15:18:43 GMT
server-timing: cdn-cache; desc=HIT
server-timing: edge; dur=1
x-akamai-edgeworker-onclientresponse-info: ew=9xx v:Demo_RedirectGeo; status=UnimplementedEventHandler
x-akamai-edgeworker-onclientrequest-info: ew=9xx v0.9.2:Demo_RedirectGeo; status=Success
server-timing: ak_p; desc="1686151123657_381190694_44213894_27_8634_24_54_15";dur=1
```
4. Drag and drop the code bundle onto the window and click the **Create version** button.
# 5. Activate the EdgeWorker version
1. From the EdgeWorkers versions page, select your EdgeWorker ID.
Only the EdgeWorkers you have permission to access appear in the list.
2. Click the **Activate version** button.
3. Select the EdgeWorker version that you want to activate.
4. Select the **Staging** network to test your code sample.
# 6. Test the EdgeWorkers function
You can use a curl request, resolved to staging, to exercise the EdgeWorkers function.
> 📘 For more information on how to resolve an IP address refer to the [Getting Started for HTTPS Properties](https://techdocs.akamai.com/property-mgr/docs/serve-content-over-https) documentation.
1. Use this curl request to test the `locationBasedRedirect` EdgeWorkers function.
Replace [akamai staging name] with the staging Edge hostname of your website. The staging Edge hostname uses the **.edgekey-staging.net** domain.
```curl
curl https://[your website name]/redirectGeo --connect-to ::[akamai staging name] -H "Pragma: akamai-x-ew-debug" -sD - -sD -
```
2. The curl request should produce output similar the following.
```html
HTTP/2 302
location: https://[your website name]/redirectGeo
content-type: text/html
content-length: 0
expires: Wed, 07 Jun 2023 15:18:43 GMT
cache-control: max-age=0, no-cache, no-store
pragma: no-cache
date: Wed, 07 Jun 2023 15:18:43 GMT
server-timing: cdn-cache; desc=HIT
server-timing: edge; dur=1
x-akamai-edgeworker-onclientresponse-info: ew=9xx v:Demo_RedirectGeo; status=UnimplementedEventHandler
x-akamai-edgeworker-onclientrequest-info: ew=9xx v0.9.2:Demo_RedirectGeo; status=Success
server-timing: ak_p; desc="1686151123657_381190694_44213894_27_8634_24_54_15";dur=1
```